How To Edit Medical ID on iPhone: Medical ID is a safety tool that Apple puts on your iPhone. It’s easy for people around you to find out more about your health and medical problems with this tool, in case of an emergency. The Medical ID keeps track of your vital medical information, like your blood type, age, main language, medical conditions, allergies, responses, and the medicines you’re taking at the moment.
These details can be set up to appear even when your iPhone is locked, so people nearby or emergency services can quickly see what’s going on with you. These steps will make it as easy as possible for you to change your Medical ID on your iPhone.
How To Edit Medical ID on iPhone:
On your iPhone, you can change your Medical ID in two ways: first, use the Health app. Second, use the Settings app.
Step 1: Use the Health app BRIEF GUIDE:
To change your medical ID, open the Health app and go to your profile picture. You can add or change any information you think is important here. You can also list the phone numbers of family and friends as Emergency Contacts so they know what to do if you need help.
HOW TO DO IT: On your iPhone, open the Health app and tap on your picture in the upper right corner.
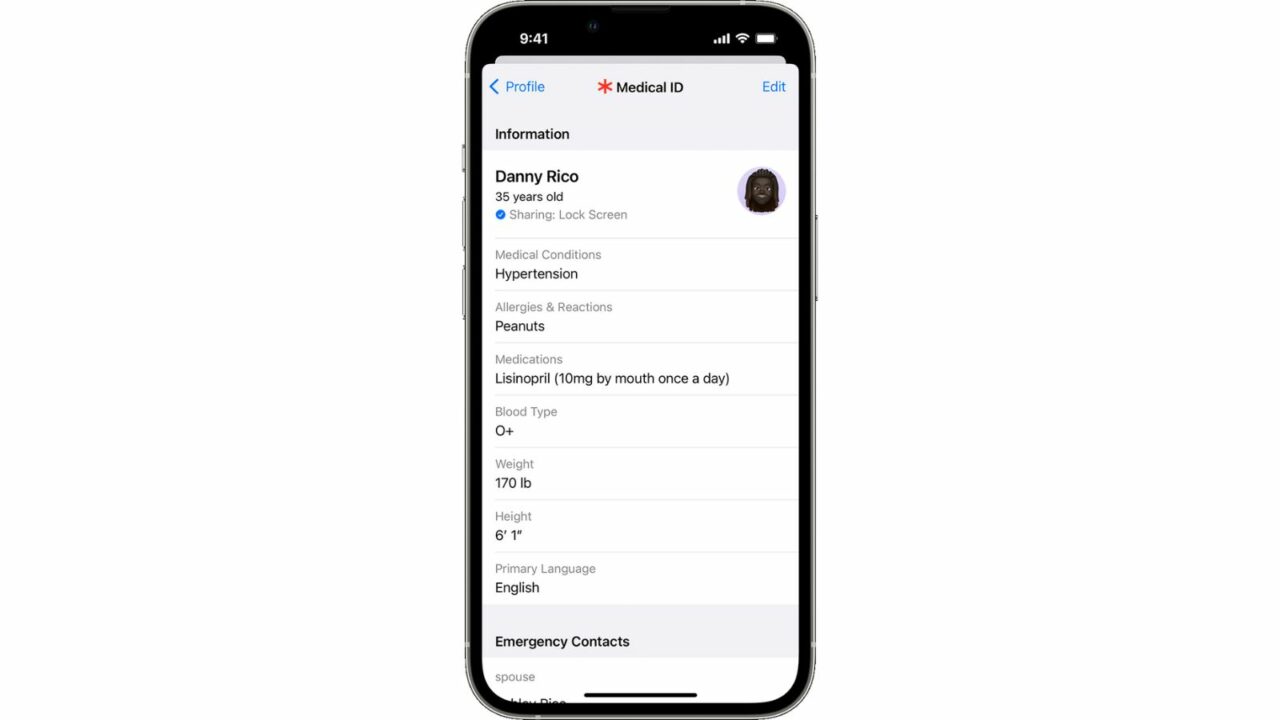
Press on Medical ID on the next screen. In case of an emergency, the Medical ID screen will show all the medical and emergency information you had already saved on your iPhone.
Tap on Edit in the upper right area to make more changes to these settings. When the Medical ID screen goes into edit mode, you can change the information that’s already there or add new information to different parts of it.
In these areas, you can write down things like medications, weight, height, blood type, allergies and reactions, and medical conditions.
Adding and changing emergency friends is also possible, so they will get your SOS texts on time. To add a new emergency contact, go to “Emergency Contacts” and tap on “+ add emergency contact.” Then, pick out any contact you want to add. Then, you can give them a relationship to you so that you know more about them when other people look at your Medical ID.
The “Show When Locked” setting under “Emergency Access” can be turned on so that other people can see your Medical ID even when your iPhone is locked. If you tap the Emergency button on your iPhone’s lock screen, you can get to your Medical ID. To save the changes you made to the Medical ID, tap “Done” in the upper right spot.
Now you’ll see the Medical ID screen with all the new information you added when you edited it. The “Information” section of this screen will show your medical information, and the “Emergency Contacts” part will show the contact information of the people you added.
Step 2: Use the Settings app BRIEF GUIDE:
To change your medical ID, open the Settings app and go to Health > Medical Details > Edit. You can add or change any information you think is important here. You can also list the phone numbers of family and friends as Emergency Contacts so they know what to do if you need help.
GIF HELP:
HOW TO DO IT: On your iPhone, open the Settings app. In the Settings screen, scroll down and tap Health.
Pick up the Medical ID from the list of “Medical Details” in Health. In case of an emergency, the Medical ID screen will show all the medical and emergency information you had already saved on your iPhone.
Tap on Edit in the upper right area to make more changes to these settings. When the Medical ID screen goes into edit mode, you can change the information that’s already there or add new information to different parts of it.
Some of these are medical conditions, allergies and reactions, medications, weight, height, blood type, and so on.
Adding and changing emergency friends is also possible, so they will get your SOS texts on time. To add a new emergency contact, go to “Emergency Contacts” and tap on “+ add emergency contact.” Then, pick out any contact you want to add. Then, you can give them a relationship to you so that you know more about them when other people look at your Medical ID.
The “Show When Locked” setting under “Emergency Access” can be turned on so that other people can see your Medical ID even when your iPhone is locked. If you tap the Emergency button on your iPhone’s lock screen, you can get to your Medical ID. To save the changes you made to the Medical ID, tap “Done” in the upper right spot.
Now you’ll see the Medical ID screen with all the new information you added when you edited it. The “Information” section of this screen will show your medical information, and the “Emergency Contacts” part will show the contact information of the people you added.
FAQs
What should you put on your Medical ID?
The Medical ID should have all the information you know about your health and medical problems written on it. However, when you set it up, you must include the following very important information: your name, age, blood group, first language, allergies and responses, and any major medical condition you have. You can add the rest of the information if you need to.
What takes place when you add someone as an emergency contact?
Your family and close friends can be added as emergency contacts on your Medical ID when you set it up. You will receive an Emergency SOS message if you make someone an emergency contact. Send your friends and family this message so they can get in touch with you or ask for more help. Make sure your Medical ID has as many emergency contacts as possible so that you can get help quickly.
Can everyone get to your Medical ID?
By default, your Medical ID isn’t public, but you can make it public if you want. Anyone with physical access to your iPhone can see your Medical ID and emergency contacts in an emergency. Step 5 of either of the above guides will show you how to do that.
That’s all there is to know about making changes to your iPhone Medical ID.